Animal Face Recognition
ECE5725 Final Project
Fall 2022
By Guangxun Zhai (gz244) & Cynthia Li (xl827)
Demonstration Video
Introduction
In the 5725 final project, our group invented an animal face recognition system using Raspberry Pi 4 and an attached legacy camera module. The whole software system is mainly separated into two sections: a web server on R-Pi and a machine learning algorithm. We have first constructed a basic server and trained a simple machine learning algorith, then implemented more features of the server such as button interaction, page jumping, camera streaming, etc. and improved the ML model, and finally connected the two sections together.
In the final prototype, the users are able to interact with the server to take photos of themselves, save it to a local path and analyze the result, which, in this case, is the animal that is most similar to the face in that photo. Finally, the result data will be updated to the server and showcased to audiences. This project is viewed as an embedded system since it includes software and hardware parts and could be easily divided into I/O, memory, and computer processor components.
Project Objective

Face recognition filter is trending on many social media, such as Instagram, etc. Training the machine learning model and conduct recognition process is computationally expensive and takes a long time. Therefore, we are interested in simplifying the animal face recognition system on a server built on Raspberry Pi 4 whose CPU and memory is less powerful. Out ultimate goal are:
- Build up a server and implement basic functions including showing webpages, jumping through webpages, running camera module, etc.
- Train a model that finds the most similar animal face type among multiple classes given an input image
- Combine webpages and machine learning together to provide animal face recognition service to users
Design and Testing Procedures
Server Implementation
In order to have a showing interface to demo the result of our animal face recognization and also to have a more easily-understood using process, we dedcided to build a server on Pi, and use webapges as the more integradted interface for users to more easily experience our service. Overall, for this part, we are separated into 3 major key points: setting up the server, designing the webpages, interaction with the camera. The interaction with the face recognization algorithm would be discuused later in this section.
Set up the Server
We have choosen to set up a Apache server directly on Pi. The reason why we chose Apache Server is that our group initially have poor experience on developing web or server. So we would like to choose a popular server since we will more easily to find more documents of it from Google. Besides, Apache Sever is an open-source server, so it is free and just suits our beginners. The whole porcess of setting up the server isn't that hard. We mostly follow a tutorial provided in the below reference and eventually get a index.html for our web mainpage code.
Design Webpage
As mentioned above, we initially just have an index.html for the mainpage. Then we tried our best to learn how to write html code for the webpage from Youtube. After getting a brief idea what http and its basic syntax, we started to look for some example html template, and made adjustment on it. It took us almost two weeks to get familiar with the html code, most of the design element is done by the "style" tag inside html. And whenever we encountered any problem: we looked the issue up in the tutorial from w3schools website, tried the example code, and modified the code to fit our demands.
Interact with Camera
We followed the totrial listed in the below reference and installed the camera moduel. The only thing that need to be mentional for the installation here is:
for the 32-bit pi operating system, it is possible to get camera data to the web and use camerastill command at the same time. However, since the installation of Tensorflow
requires a 64-bit OS, and for a 64-bit Pi, we use libcamera instead of camerastill for commad lines. Moreover, the use of libcamera requires user to unenable the
legacy camera in the interface setting, and after unenabling the legacy camera, the webpage will have no method to get the camera images from the web code.
For the interaction between webpage and camera, we used javascript to get image data from the camera module, and keep streaming it onto the webpage. And also, we
need to enable the legacy camera in the interface setting, though we will lose the right to use cmd to capture the photo. In addition, for our webpage, we also used
javascript to print out our photo and have the feature for downloading the photo to a local path.
Face Recognition Algorithm
Developing the face recognition algorithm has 3 steps: obtaining dataset, tuning model, designing comparison algorithm of input image to the ML model.
Obtaining Dataset
At first, we tried to write program that generates url and extracts multiple desired images from the Google Chrome with the number of images specified by an input argument. However, this has many problems. The resources we looked up suggested using webdriver such as chromium or selenium where we lack of experience and the debugging tools for selenium is relatively limited. Also, many of the downloaded images weren't desired: it might include multiple targets, distracting objects (such as human), partial objects, watermarks, etc. and the downloaded format are messy. In the end, the efficiency of using volume downloading seems to be no more than manually creating the dataset. Therefore, we finally still chose to manually select the data set.
For the dataset, there are several things to consider: 1. number of classes; 2. the size of the dataset; 3. format of the dataset; 4. data selection. We decided that 7 classes of animals (cat, dog, fox, lion, tiger, rabbit, koala) has enough diversity for use. Also, since we are downloading the images manually, we decided that 100 images in each class are sufficient. They are divided into 80 images for training, 10 images for validation, and 10 images for testing based on 80-10-10 rule. Last, we decided that jpg, jpeg, and png format are used. Particularly, I looked into 10 different breeds in each class to better represent the class and included 10 images of each breed in the dataset except for koala, which seems to only have 1 breed. It is worth noticing that the breed variance in class cat and dog is much larger than all the other classes.
In testing the training model program, we started using a small dataset with only 2 classes and 2 image in each class as it is simple model and therefore more time efficient.
Tuning Model
There are many libraries that have face recognition functions. Originally, we tried to implement the model with SIFT based on last year's SmartKart project [1]. SIFT is desirable as it is fast, insensitive to scale and orientation, and it can extract many crucial key points even on small objects even with no prior segmentation. However, the SIFT library in OpenCV has already expired, we need to build SIFT model completely on our own. Based on the condition of algorithm complication and lack of experience, we decided to explore Keras library and use existing ML models.
From Keras API, we found many fully established models, including the trending VGG, Inception algorithms, etc. With the strong API references and other online guidelines on each step of building Keras model, creating and debugging the model tuning program wasn't the hard part. After ensuring the functionality of the model tuning program, I expanded the dataset from 10 in each class to 100 in each class as described in the previous section and started tuning. The models we looked at include VGG16, VGG19, ResNet50, InceptionV3, Xception. Since we have a small validation dataset, I tried batch normalization with batch size of 1, 3, 5 and find that batch size of 5 seems to perform the best on all models. I also tuned each model with different epoch number. In the end, VGG16, InceptionV3, and Xception seems to have the optimal results, all having the accuracy around 90% as shown below in Fig.1. The accuracy here is absolute accuracy: the portion of correctly classified validation image number divide by the total number of validation set. Therefore, these 3 models are all good to use. These models have different back-propagation methods and do not require prior segmentation. For example, for VGG16 model, the training process already included segmentation at different levels for deeper feature extractions and is insensitive scale, orientation, etc. which improves the accuracy and saves large computation cost on preprocessing the images.
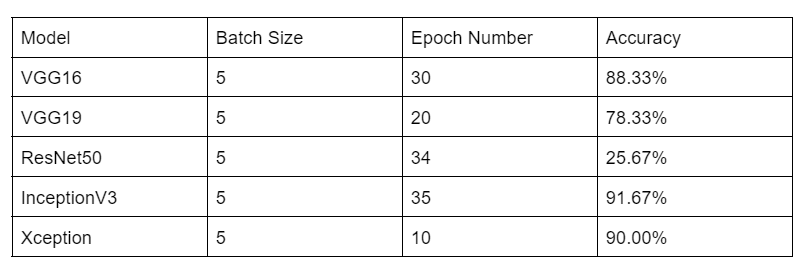
Fig. 1 Model Tuning Result Table
Face Recognition Algorithm
The face recognition algorithm is basically extracting an input image (human face) from local path, extracting the tuned (selected) model from local path, analyzing the input image by passing it to the model for comparison, and writing the result to the file specified. The program is relatively simple. We first tested the program on JupyterHub (on our own computer) and it could execute properly. After we ensured the functionality of the program, we copied the dataset, and the model to test the program on R-Pi, which gave many dependency error messages. However, even after we attempted to install keras and tensorflow it still have the same problem. We checked the Keras and Tensorflow version on JupyterHub which is on python 3.7, so we tried to downgrade python on R-Pi, which still couldn't solve the problem. In the end, we found that Tensorflow is not compatible to 32-bit system, so we reinstalled the R-Pi system to 64-bit kernel and reinitialized R-Pi as in Lab 1 and Lab 2. One hard part of this section is that we don't know if the human face is classified correctly or not, we can only trust the previous validation accuracy which is tested on animal faces. Also, from testing with human faces downloaded from Google, most people are classified to cat and dogs. This makes sense because the variation among the 10 breeds of cat or dog is much larger than other classes, which makes their features more diverse than all the others.
Connecting Server And Recognition Algorithm
For transmiting data from server to the local python code, we failed to use the traditonal way of internet port. And we also tried to used php code to directly call the python code to run, however, the running of python code takes long, and it seems that the webpage cannot easily wait for the final result of the python running. After several tries, we decided to run the python code of the Recognition Algorithm at first in the background. And what does the python code do it to keep scanning a local path and waiting for the caputured photo being saved down, and as soon as it finds the photo in that directory, it will run the model, write the final result into a local txt file. This python code analyzing process will takes around 20s. And we just added a loading page (loading for 30s for safe), and after this 30s, we utilzied php to read the string inside that txt file, and jump to different animal result webpages depending on the output string from the python code.
Result
Overall, our program has achieved our goal. The server and the background running in the background can successfully interact with each other to complete the face recognition function shown in the flowchard below in Fig. 2 and a physical button is able to shut down the background program as bail out. However, it is true that the ML model did not work as well as we planned. First, Raspberry Pi 4 camera is sensitive to light settings, the photo it takes seems to be relatively redder than appears in regular camera, which lead to many people classified to "Tiger". This is also because that the ML model considers color as crucial features as well. Second, currently the server jumps to a loading page which is set to 30 seconds once starts analyzing rather than responding to the background python program immediately.
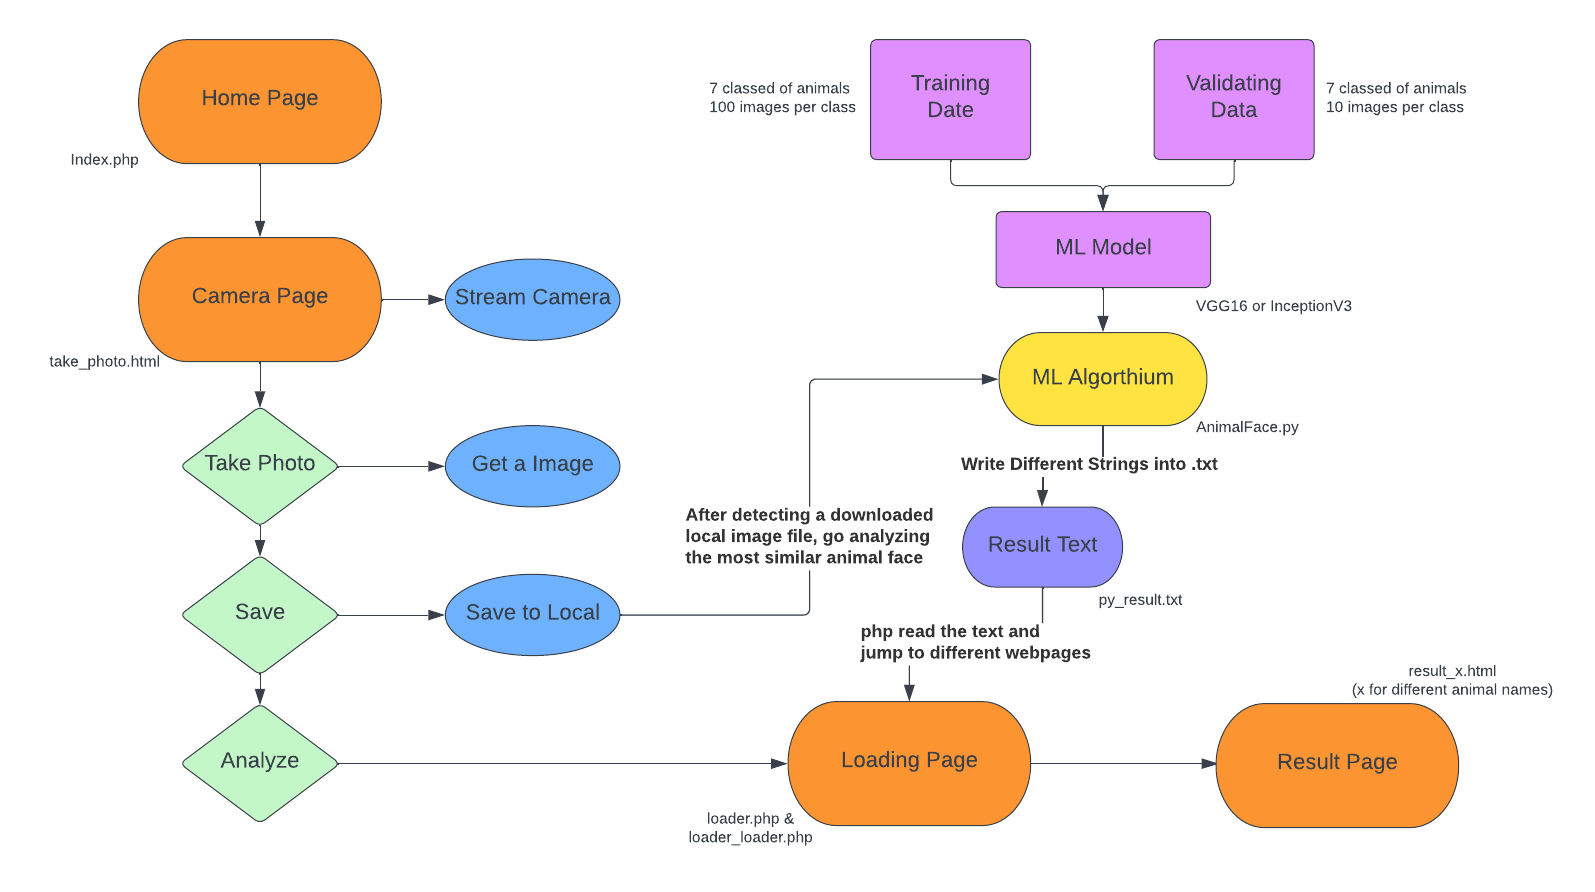
Fig. 2 Final System Flowchart
Conclusion
From the result, we believe we have finsihed almost everything planned in the beginning proposal, and we are able to provide a whole web service for people to know which animal does they most look like. The service content itself is also intriguing and has achived our goal. Things that we haven't achieved would be: first, for a server, we cannot access the service from any other computers since the saving photo feature saves the photo to the local pc. Besides, we orignially planned to have a better and more detailed result animal webpage, however due to the lacking of time and limitation of the machine learning model, we simplified the result page to single texts combined with single animal background.
Future Work
With additional time, we can improve both the server and machine learning model. For the server, we could explore how to make page jump once the recognition algorithm finishes. In addition, we can also explore implementing the uploading feature, which allows the users to upload their own pictures (rather than taking photos from the camera) and analyze them using the algorithm, allowing any users with the same WiFi to play with the face recognition system. We have tried to build this feature but were stuck with where the uploaded pictures should go (to cloud or to local path) and how R-Pi should access the uploaded photo.
For the ML algorithm, we may add segmentation and face recognition features to preprocess the input image to improve accuracy and explore how to deal with light sensitivity of the camera and the color sensitivity of ML model. Besides, we can also try to implement the ML model with SIFT so that viewpoint may affect the result less. Last, we can implement the feature to return the most similar animal face in the dataset and similarity (in number) to the users.
Work Distribution
Guangxun Zhai
gz244@cornell.edu
Constructed the Overall Webpage Architecture.
Cynthia Li
xl827@cornell.edu
Implemented Machine Learning Model for the Computation.
Budget
- Raspberry Pi 4 - Provided in lab (unit price $35)
- Raspberry Pi Camera Module - Provided in lab (unit price $19.95)
Total: $54.95
References
Set up Apache Web Server on PiInstall php on Pi
Set up camera module on Pi
php Tutorial
html Tutorial
Pass Image from php to Python
Online html Code Generator
Tensorflow install
Machine Learning for Recognizing what Animal are you
ChatGPT AI
[1] Shah, A., Azadze, C., & Menon, P. (2020, May 20). SmartKart. Retrieved December 15, 2022, from https://courses.ece.cornell.edu/ece5990/ECE5725_Spring2020_Projects/May_18_Demo/SmartKart/M_as2564_cea95_pjm355/smartKart-master/index.html
[2] Keras.fit() and keras.fit_generator(). GeeksforGeeks. (2020, June 25). Retrieved December 15, 2022, from https://www.geeksforgeeks.org/keras-fit-and-keras-fit_generator/
[3] Rosebrock, A. (2021, July 4). How to use Keras Fit and fit_generator (a hands-on tutorial). PyImageSearch. Retrieved December 15, 2022, from https://pyimagesearch.com/2018/12/24/how-to-use-keras-fit-and-fit_generator-a-hands-on-tutorial/
[4] Team, K. (n.d.). Keras Documentation: Keras API reference. Keras. Retrieved December 15, 2022, from https://keras.io/api/
Code Appendix
// index.php
<!DOCTYPE html>
<html lang="en">
<head>
    <meta charset="UTF-8">
    <meta http-equiv="X-UA-Compatible" content="IE=edge">
    <meta name="viewreport" content="width=device-width, initial-scale=1.0">
    <title>Document</title>
    <style>
        *{
	    margin: 0;
	    padiing: 0;
	    text-decoraction: none;
	    list-style: none;
        }
	.header,.nav,.container,.footer{
	    float: left;
            width: 100%;
	    box-sizing: border-box;
        }
        .header{
            background-color: powderblue;
            padding: 20px;
            text-align: center;
        }
	.content{
	    margin: 0px
	    padding: 5px
	    box-sizing: border-box;
	    text-align: center;
	}
	.button{
	    border: none;
	    color: white;
            padding: 15px 32px;
            test-align: center;
            text-decoration: none;
            display: inline-block;
            font-size: 16px;
            margin: 4px 2px;
            cursor: pointer;
        }
	.button1 {background-color: #4CAF50;}

	.footer{
	    padding: 10px;
	    background: #ccc;
	    text-align: center;
	}
	@media screen and (max-width:700px) {
	    .content{
		width: 100%;
		margin: 0px;
	    }
	}
    </style>
</head>
<body>
    <div class="main">
         <div class="header">
              <h1>See which Animal is Your Face</h1>
              <p><img src="./index_imgs/cat.jpeg" alt="error: no cat" width="90" height="90">
		 <img src="./index_imgs/kola.jpeg" alt="error: no kola" width="90" height="90">
	         <img src="./index_imgs/lion.jpeg" alt="error: no lion" width="90" height="90">
		 <img src="./index_imgs/dog.jpeg" alt="error: no dog" width="90" height="90">
		 <img src="./index_imgs/rabbit.jpeg" alt="error: no rabbit" width="90" height="90">
		 <img src="./index_imgs/tiger.jpeg" alt="error: no tiger" width="90" height="90">
		 <img src="./index_imgs/fox.jpeg" alt="error: no fox" width="90" height="90">
	      </p>
         </div>
	 <div class="container">
	      <div class="content">
		   <h2>We Need a Human Face Image</h2>
	           <br/>
	           <p>Click the Button Below to Get a Snapshot</p>
		   <br/>
		   <a href="./take_photo.html">
		   	<button class="button button1">Get Started</button>
		   </a>
		   <br/>
	      </div>
	 </div>
	 <div class="footer">
	      <p>© Created by Guangxun Zhai, Cynthia Li in 2022</p>
	      <p>ECE 5725 Project</p>
	 </div>
    </div>
<!-- Configure a few settings and attach camera -->
<script language="JavaScript">
    Webcam.set({
        width: 490,
        height: 390,
        image_format: 'jpeg',
        jpeg_quality: 90
    });

    Webcam.attach( '#web_cam' );

    function take_snapshot() {
        Webcam.snap( function(web_cam_data) {
            $(".image-tag").val(web_cam_data);
            document.getElementById('response').innerHTML = '<img src="'+web_cam_data+'"/>';
        } );
    }
</script>
</body>
</html>
// take_photo.html
<!DOCTYPE html>
<html lang="en">
<head>
    <meta charset="UTF-8">
    <meta http-equiv="X-UA-Compatible" content="IE=edge">
    <meta name="viewreport" content="width=device-width, initial-scale=1.0">
    <title>Document</title>
    <style>
        *{
	    margin: 0;
	    padiing: 0;
	    text-decoraction: none;
	    list-style: none;
        }
	.header,.footer{
	    float: left;
            width: 100%;
	    box-sizing: border-box;
        }
        .header{
            background-color: powderblue;
            padding: 20px;
            text-align: center;
        }
	.content{
	    margin: 5px
	    padding: 0
	    box-sizing: border-box;
	    text-align: center;
	}
	.footer{
	    padding: 10px;
	    background: #ccc;
	    text-align: center;
	}
	.button{
	    border: none;
	    color: white;
            padding: 15px 32px;
            test-align: center;
            text-decoration: none;
            display: inline-block;
            font-size: 16px;
            margin: 4px 2px;
            cursor: pointer;
        }
	.button1 {background-color: #4CAF50;}
	.button2 {background-color: #008CBA;}
	.button3 {background-color: #BF553E;}

	@media screen and (max-width:700px) {
	    .content{
		width: 100%;
		margin: 0px;
	    }
	}
    </style>
</head>
<body>
    <div class="main">
         <div class="header">
              <h1>See which Animal is Your Face</h1>
              <p><img src="./index_imgs/cat.jpeg" alt="error: no cat" width="90" height="90">
		 <img src="./index_imgs/kola.jpeg" alt="error: no kola" width="90" height="90">
	         <img src="./index_imgs/lion.jpeg" alt="error: no lion" width="90" height="90">
		 <img src="./index_imgs/dog.jpeg" alt="error: no dog" width="90" height="90">
		 <img src="./index_imgs/rabbit.jpeg" alt="error: no rabbit" width="90" height="90">
		 <img src="./index_imgs/tiger.jpeg" alt="error: no tiger" width="90" height="90">
		 <img src="./index_imgs/fox.jpeg" alt="error: no fox" width="90" height="90">
	      </p>
         </div>
	 <div class="container">
	      <div class="content">
		   <h2>Give Yourself a Snapshot</h2>
	           <p>Use the below button to grab your head photo</p>
		   <br/>
		   <div>
				<video id="webcam-stream" width="400" height="300"></video>
				<img id="taken-photo" width="400" height="300">
			</div>
			<button class="button button1" id="capture-button">Capture Photo</button>
			<button class="button button2" id="save-button" disabled>Save Photo</button>
			<button class="button button3" id="jump-button" onclick="document.location='./loader.php'" disabled>Analyze Photo</button>
	      </div>
	 </div>
	 <div class="footer">
	      <p>© Created by Guangxun Zhai, Cynthia Li in 2022</p>
	      <p>ECE 5725 Project</p>
	 </div>
    </div>

	<script>
		// Set up video stream
		const video = document.getElementById('webcam-stream');
		navigator.mediaDevices.getUserMedia({ video: true })
		  .then(stream => {
			video.srcObject = stream;
			video.play();
		  });

		// Set up photo capture button
		const captureButton = document.getElementById('capture-button');
		captureButton.addEventListener('click', event => {
		  // Create canvas element to display photo
		  const canvas = document.createElement('canvas');
		  canvas.width = video.videoWidth;
		  canvas.height = video.videoHeight;
		  const context = canvas.getContext('2d');
		  context.drawImage(video, 0, 0);

		  // Set taken photo as source of 'taken photo' img element
		  const img = document.getElementById('taken-photo');
		  img.src = canvas.toDataURL('image/png');

		  // Enable save button
		  document.getElementById('save-button').disabled = false;
		});

		// Set up save photo button
		const saveButton = document.getElementById('save-button');
		saveButton.addEventListener('click', event => {
		  // Get image data from 'taken photo' img element
		  const img = document.getElementById('taken-photo');
		  const imageData = img.src;

		  // Download image
		  const link = document.createElement('a');
		  link.download = 'input.jpeg';
		  link.href = imageData;
		  link.click();

		  // Enable jump button
		  document.getElementById('jump-button').disabled = false;
		});
	  </script>

</body>
</html>
// loader.php
<style>
  .loader-container {
    text-align: center;
  }

  .loader {
    position: absolute;
    left: 50%;
    top: 60%;
    z-index: 1;
    width: 150px;
    height: 150px;
    margin: -75px 0 0 -75px;
    border: 16px solid #f3f3f3;
    border-radius: 50%;
    border-top: 16px solid #3498db;
    width: 120px;
    height: 120px;
    -webkit-animation: spin 2s linear infinite;
    animation: spin 2s linear infinite;
  }

  p {
        text-align: center;
        position: absolute;
        left: 50%;
        top: 50%;
        margin-top: -150px;
        margin-left: -100px;
        width: 200px;
      }

  @keyframes spin {
    0% { transform: rotate(0deg); }
    100% { transform: rotate(360deg); }
  }
  </style>

  <?php

  // Print out the HTML for the loading spinner and message
  echo "<div class='loader-container'>";
  echo "<div class='loader'></div>";
  echo "<p>Please Wait...</p>";
  echo "</div>";

  header("refresh: 30; url=loader_loader.php");

  ?>
// loader_loader.php
<!DOCTYPE html>
<html>
<body>

<?php

$file = fopen('py_result.txt', 'r');
$num = fgets($file);
fclose($file);
echo $num;

if ($num == "1") {
  echo "get 1";
  header("Location: result/result_cat.html");
} elseif ($num == "2"){
  echo "get 2";
  header("Location: result/result_dog.html");
} elseif ($num == "3"){
  echo "get 3";
  header("Location: result/result_fox.html");
} elseif ($num == "4"){
  echo "get 4";
  header("Location: result/result_koala.html");
} elseif ($num == "5"){
  echo "get 5";
  header("Location: result/result_lion.html");
} elseif ($num == "6"){
  echo "get 6";
  header("Location: result/result_rabbit.html");
} elseif ($num == "7"){
  echo "get 7";
  header("Location: result/result_tiger.html");
} else {
  echo "you made wrong";
}

?>

</body>
</html>
// result_cat.html
<!DOCTYPE html>
<html>
<head>
<style>
	body {
  		background-image: url('./result_imgs/cat_bkg.jpg');
  		background-repeat: no-repeat;
  		background-attachment: fixed;
  		background-size: cover;
	}
	h1 {
		font-family: Arial, sans-serif;
		font-size: 40px;
		color: #6f4974;
		text-align: center;
		}
	p {
		font-family: Garamond, serif;
		font-size: 32px;
		text-align: center;
		color: #8d448b;
		font-style: normal;
		font-weight: bold;
		}
</style>
</head>
<body>
	<h1>Test Result</h1>
	<p>You Looks like a Cat!</p>
</body>
</html>
// start.sh
#!/bin/bash

#python3 3_Recognize_Image.py --image_path 1.jpg
#python3 test_writetxt.py
python3 AnimalFace.py --image_path /home/pi/Downloads/input.jpeg
// Model_Training.py
import pandas as pd
import numpy as np
import time
start = time.time()
import warnings
warnings.filterwarnings('ignore')
import os
import sys
import glob
import argparse
import matplotlib.pyplot as plt
from keras.models import Sequential, load_model, Model
from keras.layers import Conv2D, MaxPooling2D
from keras.layers import Activation, Dropout, Flatten, Dense, Input, GlobalAveragePooling2D
from keras.preprocessing.image import ImageDataGenerator
from keras.callbacks import EarlyStopping, ModelCheckpoint, TensorBoard
from keras import optimizers
from keras.applications import VGG16, ResNet50, VGG19, InceptionResNetV2, DenseNet201, Xception, InceptionV3
from keras import backend as K
from util import *

K.set_image_data_format('channels_last')

# Supporting functions for the training process
def ensure_directory(path):
    import os
    if not os.path.exists(path):
        os.mkdir(path)

def current_time():
    from datetime import datetime
    print('='*50)
    print(str(datetime.now()))

def get_index_to_label(label_to_index):
    ensure_directory(processed_path)
    # index_to_label.txt is the same content as the animal class dictionary used in AnimalFace.py
    if not os.path.exists(os.path.join(processed_path, 'index_to_label.txt')):
        index_to_label = dict((i,j) for j,i in label_to_index.items())
        import json
        with open(os.path.join(processed_path, 'index_to_label.txt'), 'w') as outfile:
            json.dump(index_to_label, outfile)

def add_new_layer(base_model, CLASS_SIZE):
    x = base_model.output
    x = GlobalAveragePooling2D()(x)
    x = Dense(256, activation='relu')(x)
    x = Dropout(0.4)(x)
    predicts = Dense(CLASS_SIZE, activation='softmax')(x)
    model = Model(inputs=base_model.input, outputs=predicts)
    return model

def setup_to_transfer_learn(model, base_model):
    for layer in base_model.layers:
        layer.trainable = False
    model.compile(optimizer='rmsprop', loss='categorical_crossentropy', metrics=['accuracy'])
    print("{:<10} premodel layers: {}".format('[Info]', len(base_model.layers)))
    print("{:<10} New model layers: {}".format('[Info]', len(model.layers)))

def get_callbacks_list(train_choice):
    tensorboard = TensorBoard(log_dir="TensorBoard/logs/{}".format(time.time()))
    earlystopping = EarlyStopping(monitor='val_loss', patience=2, verbose=0)
    callbacks_list = [earlystopping, tensorboard]
    return callbacks_list

def setup_to_finetune(model):
    layer_num = len(model.layers)
    trainable_layer_num = max(int(layer_num * 0.1), 8)
    for layer in model.layers[ : -trainable_layer_num]:
        layer.trainable = False
    for layer in model.layers[-trainable_layer_num : ]:
        layer.trainable = True
    model.compile(optimizer=optimizers.SGD(lr=0.0001, momentum=0.9), loss='categorical_crossentropy', metrics=['accuracy'])
    print("{:<10} Trainable model layers : {}".format('[INFO]', trainable_layer_num))
    print("{:<10} Unrainable model layers: {}".format('[INFO]', layer_num - trainable_layer_num))


def train():
    # data prep
    current_time()
    print("{:<10} Getting Data Ready ...".format('[Info]'))

    train_datagen =  ImageDataGenerator(
        rescale=1. / 255,
        rotation_range=30,
        width_shift_range=0.2,
        height_shift_range=0.2,
        shear_range=0.2,
        zoom_range=0.2,
        horizontal_flip=True)
    train_generator = train_datagen.flow_from_directory(
        train_path,
        target_size=(IM_WIDTH, IM_HEIGHT),
        batch_size=BATCH_SIZE,
        class_mode='categorical')
    val_datagen = ImageDataGenerator(
        rescale=1. / 255)
    val_generator = val_datagen.flow_from_directory(
        val_path,
        target_size=(IM_WIDTH, IM_HEIGHT),
        batch_size=BATCH_SIZE,
        class_mode='categorical')
    get_index_to_label(train_generator.class_indices)

    base_model = model(include_top=False, weights='imagenet', input_shape=(IM_WIDTH, IM_WIDTH, 3))
    m = add_new_layer(base_model, CLASS_SIZE)
    setup_to_transfer_learn(model, base_model)
    print('Loaded %s' % ((time.time() - start) / 60, input_model))

    current_time()
    print('Start building model... %s' % ((time.time() - start) / 60, input_model))
    build_start = time.time()
    model.fit_generator(
        train_generator,
        steps_per_epoch = TRAIN_SIZE // BATCH_SIZE,
        epochs = EPOCHS,
        callbacks = get_callbacks_list('build'),
        val_data = val_generator,
        val_steps = VAL_SIZE // BATCH_SIZE)
    model.save(os.path.join(model_path, 'build', input_model + '.h5'))

    print('%0.2f min: Finish building model %s' % ((time.time() - start) / 60, input_model))
    print("{:<10} Building model took {:.2f} min".format('[Info]', (time.time() - build_start) / 60 ))
    current_time()
    print('%0.2f min: Model tuning starting... %s' % ((time.time() - start) / 60, input_model))

    tune_start = time.time()
    setup_to_finetune(model)
    model.fit_generator(
        train_generator,
        steps_per_epoch = TRAIN_SIZE // BATCH_SIZE,
        epochs = EPOCHS,
        callbacks = get_callbacks_list('tune'),
        val_data = val_generator,
        val_steps = VAL_SIZE // BATCH_SIZE)
    model.save(os.path.join(model_path, 'tune', input_model + '.h5'))
    print('%0.2f min: Finish tuning model... %s'%((time.time() - start) / 60, input_model))
    print("{:<10} It takes {:.2f} min to tune the model".format('[Info]', (time.time() - tune_start) / 60 ))


# Define PATH to each data location
home_path = os.getcwd()
dataset_path = os.path.join(proj_path, 'DataFile')
train_path = os.path.join(dataset_path, 'ImageTrain')
val_path = os.path.join(dataset_path, 'ImageVal')
processed_path = os.path.join(home_path, 'ProcessedData')
model_path = os.path.join(home_path, 'Model')
pred_path = os.path.join(home_path, 'Predict')

# Get class size, training size, and validation size from the given PATH
classes = [f for f in get_subfolder_names(train_path)]
train_counts = [len(get_sub_fnames(cate_folder)) for cate_folder in get_subfolder_paths(train_path)]
val_counts = [len(get_sub_fnames(cate_folder)) for cate_folder in get_subfolder_paths(val_path)]

# Define models from Keras Library to be used
models_lib = {
    'VGG16': VGG16,
    'VGG19': VGG19,
    'DenseNet201': DenseNet201,
    'ResNet50': ResNet50,
    'InceptionResNetV2': InceptionResNetV2,
    'InceptionV3': InceptionV3,
    'Xception': Xception}

# The main program
if __name__ == '__main__':
    # get model selection and epoch size from input argument
    a = argparse.ArgumentParser(description='Training models')
    a.add_argument('--model', type=str, default='VGG16', help='classification model to be used- - VGG16, VGG19, DenseNet201, ResNet50, InceptionResNetV2, Xception or InceptionV3')
    a.add_argument('--epoch', type=int, default= 30, help='EPOCH number, set to 30 by default')
    args = a.parse_args()

    input_model = args.model
    model = models_lib[input_model]

    # initialize model parameters
    CLASS_SIZE = len(classes)
    TRAIN_SIZE = sum(train_counts)
    VAL_SIZE = sum(val_counts)
    SEED = 0
    BATCH_SIZE = 5
    EPOCHS = args.epoch
    IM_WIDTH, IM_HEIGHT = 150, 150

    # print out model info
    get_now()
    print("{:<10} Classes: {}".format('[Info]', str(classes)))
    print("{:<10} Train Size: {}".format('[Info]', str(train_counts)))
    print("{:<10} Val Size: {}".format('[Info]', str(val_counts)))
    print("{:<10} batch size: {}".format('[Info]', BATCH_SIZE))
    print("{:<10} epoch: {}".format('[Info]', EPOCHS))

    # make sure local directory of the model exists
    ensure_directory(model_path)
    model_path = os.path.join(model_path, input_model)
    ensure_directory(model_path)
    ensure_directory(os.path.join(model_path, 'build'))
    ensure_directory(os.path.join(model_path, 'tune'))
    print("{:<10} Model Selected: {}".format('[INFO]', input_model))

    train()
    current_time()
    print("{:<10} It takes {:.2f} min to finish training your model".format('[Completed]', (time.time() - start)/60 ))
    sys.exit(1)
// AnimalFace.py
import numpy as np
import os, sys
import argparse
import RPi.GPIO as GPIO
from util import *
import warnings
warnings.filterwarnings('ignore')

# Classification result dictionary
# used to convert result from String to Integer
animal_dict = {
    "cat": 1,
    "dog": 2,
    "fox": 3,
    "koala": 4,
    "lion": 5,
    "rabbit": 6,
    "tiger": 7
}

# GPIO Setup for external control to shutdown the background python code
GPIO.setmode(GPIO.BCM)
GPIO.setup(17, GPIO.IN, pull_up_down=GPIO.PUD_UP)

def process_single_image_for_predict(img, target_size):
    from PIL import Image
    from tensorflow.keras.utils import img_to_array
    img = img.resize(target_size,Image.ANTIALIAS)
    img = img_to_array(img)
    img = np.expand_dims(img, axis=0)
    img  = img.astype('float32')
    img /= 255
    return img

def getLabel(prob):
    import json
    with open('%s/index_to_label.txt' % (processed_path)) as json_data:
        index_to_label = json.load(json_data)
        json_data.close()

    index_to_label = dict((int(j), i) for j,i in index_to_label.items())
    prediction_index = np.argmax(prob, axis=-1) #multiple categories
    prediction_label = [index_to_label[k] for j in prediction_index]
    return prediction_label

def get_ordered_label():
    import json
    with open('%s/index_to_label.txt'%(processed_data_path)) as json_data:
        index_to_label = json.load(json_data)
        json_data.close()

    index_to_label = dict((int(j), i) for j,i in index_to_label.items())
    return [index_to_label[key] for key in sorted(index_to_label.keys())]

def predict_image(img):
    import os
    from PIL import Image
    from keras.models import load_model

    prob = model.predict(process_single_image_for_predict(img, (IM_WIDTH, IM_HEIGHT)))

    predict_label = getLabel(prob)[0]
    ordered_labels = get_ordered_label()

    # print result and save it to desired output file
    print(predict_label)
    f = open("py_result.txt", "w")
    f.write(str(animal_dict[predict_label]))
    f.close()

    if os.path.exists(image_file_saved_path):
        os.remove(image_file_saved_path)

        # Define PATH to each data location
        home_path = os.getcwd()
        dataset_path = os.path.join(proj_path, 'DataFile')
        train_path = os.path.join(dataset_path, 'ImageTrain')
        val_path = os.path.join(dataset_path, 'ImageVal')
        processed_path = os.path.join(home_path, 'ProcessedData')
        model_path = os.path.join(home_path, 'Model')
        pred_path = os.path.join(home_path, 'Predict')
        save_path = os.path.join(home_path, 'PredictResult')
        ensure_directory(save_path)
        display = True

        # Settings
        IM_WIDTH, IM_HEIGHT = 150, 150

        if __name__ == '__main__':
            while True:
                a = argparse.ArgumentParser()
                args = a.parse_args()
                a.add_argument("--image_path", help="path to image")
                a.add_argument("--model")
                image_file_saved_path = args.image_path

                # check if input.jpeg is saved to the PATH
                # change image to 3 channel RGB if input is 4 channels
                if os.path.exists(image_file_saved_path):
                    print("-------input detected--------")
                    image_old = Image.open('/home/pi/Downloads/input.jpeg')
                    if image_old.mode == 'RGBA':
                        image_new = image_old.convert('RGB')
                        image_new.save('/home/pi/Downloads/input.jpeg')
                    # check input argument
                    if args.image_path is None:
                        a.print_help()
                        sys.exit(1)
                    if args.model is None:
                        #model_select = 'VGG16'
                        model_select = 'InceptionV3'
                        # model_select = 'Xception'
                    else:
                        model_select = args.model

                    # Load model
                    tuned_path = os.path.join(model_path, model_select, 'tune', model_select + '.h5')
                    try:
                        model = load_model(tuned_path)
                    except:
                        exit(1)

                    # Load image
                    try:
                        image_paths = get_sub_fpaths(args.image_path)
                        image_file_saved_path = args.image_path
                        if len(image_paths) > 3:
                            display = False
                        save_path = os.path.join(save_path, args.image_path.split('/')[-1])
                        ensure_directory(save_path)
                    finally:
                        images = [read_image_from_path(image_path) for image_path in image_paths]
                    for img in images:
                        predict_image(img)
                    #sys.exit(1)

                # If not in the analyzing mode, the external button press will shutdown python in the background
                else:
                    print("-------No Input.jpg--------")
                    if (not GPIO.input(17)):
                        sys.exit(1)